|
|
| Rad 5: |
Rad 5: |
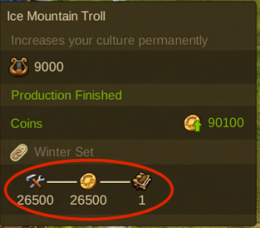
| Ett byggnadsset är komponerat av ett visst antal byggnader. En unik setbyggnad kan enbart tillhöra ett byggnadsset. Bygg dem bredvid varandra för att låsa upp deras sanna potential! Ju mer unika setbyggnader du bygger bredvid varandra, desto högre blir deras bonus. | | Ett byggnadsset är komponerat av ett visst antal byggnader. En unik setbyggnad kan enbart tillhöra ett byggnadsset. Bygg dem bredvid varandra för att låsa upp deras sanna potential! Ju mer unika setbyggnader du bygger bredvid varandra, desto högre blir deras bonus. |
| <br><br> | | <br><br> |
| {| style="text-align: center" class="mw-collapsible mw-collapsed"
| | Du kan vinna dem under events. De fyra nya setbyggnaderna är en del av 2017 vintersetevent identifieras t.ex. med en vintersetindikator [[File:winterset1.png|90px]] . Den här informationen är visad i verktygstupset när du hoovrar över nya byggnader. När minst två setbyggnader är kopplade till varandra kommer setindikatorn att lysa upp.[[File:winterset2.png|90px]] |
| !colspan="11"|Three Glacier Giants Building Set
| |
| |-
| |
| |Building
| |
| |colspan="1"|Size
| |
| |colspan="1"|Benefits
| |
| |colspan="1"|Set Bonus
| |
| |-
| |
| |[[File:IceMountainTroll.png|80px|Ice Mountain Troll]]
| |
| |5x4
| |
| |[[File:Coin_small.png|30px|Coins]]
| |
| |[[File:Supply_small.png|30px|Supplies]] ----- [[File:Coin_small.png|30px|Coins]] ----- [[File:Kpicon.png|30px|Knowledge Point]]
| |
| |-
| |
| |[[File:OrcVortex.png|80px|Orc Vortex]]
| |
| |2x4
| |
| |[[File:Supply_small.png|30px|Supplies]] or [[File:Orcs.png|30px|Orcs]]
| |
| |[[File:Supply_small.png|30px|Supplies]] ----- [[File:Supply_small.png|30px|Supplies]] ----- [[File:Supply_small.png|30px|Supplies]]
| |
| or
| |
| [[File:Orcs.png|30px|Orcs]] ----- [[File:Orcs.png|30px|Orcs]] ----- [[File:Orcs.png|30px|Orcs]]
| |
| |-
| |
| |[[File:GiantsHand.png|80px|Giants Hand]]
| |
| |4x3
| |
| |[[File:Gds1p1.png|Basic Goods]]
| |
| |[[File:Gds1p1.png|30px|Basic Goods]] ----- [[File:Gds1p2.png|30px|Basic Goods]] ----- [[File:Gds1.png|30px|Basic Goods]]
| |
| |-
| |
| |[[File:FrozenFountain.png|80px|Frozen Fountain]]
| |
| |2x3
| |
| |[[File:Supply_small.png|30px|Supplies]] or [[File:Mana.png|30px|Mana]]
| |
| |[[File:Supply_small.png|30px|Supplies]] ----- [[File:Supply_small.png|30px|Supplies]] ----- [[File:Supply_small.png|30px|Supplies]]
| |
| or
| |
| [[File:Mana.png|30px|Mana]] ----- [[File:Mana.png|30px|Mana]] ----- [[File:Mana.png|30px|Mana]]
| |
| |-
| |
| |}
| |
| <br>
| |
| {| style="text-align: center" class="mw-collapsible mw-collapsed"
| |
| !colspan="11"|The Phoenix Cult Building Set
| |
| |-
| |
| |Building
| |
| |colspan="1"|Size
| |
| |colspan="1"|Benefits
| |
| |colspan="1"|Set Bonus
| |
| |-
| |
| |[[File:Easter_Pond.png|80px|Cultist's Plaza]]
| |
| |2x3
| |
| |[[File:Gds1p2.png|25px|Basic Goods]]
| |
| |[[File:Good_marble_small.png|25px|Marble]] ----- [[File:Good_steel_small.png|25px|Steel]] ----- [[File:Good_planks_small.png|25px|Planks]] ----- [[File:Gds1p2.png|25px|Basic Goods]]
| |
| |-
| |
| |[[File:Phoenix_gong.png|80px|Phoenix Worship]]
| |
| |3x5
| |
| |[[File:Gds2p2.png|25px|Crafted Goods]]
| |
| |[[File:Good_crystal_small.png|25px|Crystal]] ----- [[File:Good_scrolls_small.png|25px|Scrolls]] ----- [[File:Good_silk_small.png|25px|Silk]] ---- [[File:Kpicon.png|25px|Knowledge Point]]
| |
| |-
| |
| |[[File:Phoenix_temple.png|80px|Temple of Phoenix]]
| |
| |5x3
| |
| |[[File:Gds3p2.png|25px|Magical Goods]]
| |
| |[[File:Good_elixir_small.png|25px|Elixir]] ----- [[File:Good_magic_dust_small.png|25px|Magic Dust]] ----- [[File:Good_gems_small.png|25px|Gems]] ---- [[File:Brokenshard.png|25px|Broken Shard Production]]
| |
| |-
| |
| |[[File:SpringPavillon_Set.png|80px|Phoenix Pavillon]]
| |
| |2x3
| |
| |[[File:Supply_small.png|25px|Supplies]]
| |
| |[[File:Supply_small.png|25px|Supplies]] ----- [[File:Supply_small.png|25px|Supplies]] ----- [[File:Supply_small.png|25px|Supplies]] ---- [[File:Supply_small.png|25px|Supplies]]
| |
| |-
| |
| |[[File:Lighthouse_Set.png|80px|Phoenix Lighthouse]]
| |
| |2x2
| |
| |[[File:Coin_small.png|25px|Coins]]
| |
| |[[File:Coin_small.png|25px|Coins]] ----- [[File:Coin_small.png|25px|Coins]] ----- [[File:Coin_small.png|25px|Coins]] ---- [[File:Coin_small.png|25px|Coins]]
| |
| |-
| |
| |}
| |
| <br>
| |
| {| style="text-align: center" class="mw-collapsible mw-collapsed"
| |
| !colspan="11"|The Woodelvenstock Building Set
| |
| |-
| |
| |Building
| |
| |colspan="1"|Size
| |
| |colspan="1"|Benefits
| |
| |colspan="1"|Set Bonus
| |
| |-
| |
| |[[File:Event_Sum_Set_2x2_0000.png|80px|IVIP Lounge]]
| |
| |2x2
| |
| |[[File:Population_small_elves.png|25px|Population]] and [[File:Coin_small.png|30px|Coins]]
| |
| |[[File:Coin_small.png|30px|Coins]] ---- [[File:Coin_small.png|30px|Coins]] ---- [[File:Supply_small.png|30px|Supplies]] ----- [[File:Supply_small.png|30px|Supplies]]
| |
| |-
| |
| |[[File:Event_Sum_Set_3x1_0000.png|80px|Lindworm Area]]
| |
| |3x1
| |
| |[[File:Gds3p2.png|30px|Magical Goods]]<br>or [[File:Mana.png |30px|Mana]]
| |
| |[[File:Gds3p2.png|30px|Magical Goods]] ----- [[File:Gds3p2.png|30px|Magical Goods]] -----[[File:Gds3p2.png|30px|Magical Goods]] ----- [[File:Gds3p2.png|30px|Magical Goods]]<br> or [[File:Mana.png|30px|Mana]] ----- [[File:Mana.png|30px|Mana]] ----- [[File:Mana.png|30px|Mana]] ---- [[File:Mana.png|30px|Mana]]
| |
| |-
| |
| |[[File:Event_Sum_Set_3x4_01_0022.png|80px|Main Stage]]
| |
| |3x4
| |
| |[[File:Population_small_elves.png|25px|Population]] and [[File:Supply_small.png|25px|Supplies]]<br>or [[File:Gds3p2.png|30px|Magical Goods]]<br>or [[File:Mana.png|30px|Mana]]<br>or [[File:Seed_icon.png |30px|Divine Seeds]]
| |
| |[[File:Supply_small.png|25px|Supplies]] ----- [[File:Supply_small.png|25px|Supplies]] ----- [[File:Supply_small.png|25px|Supplies]] ----- [[File:Kpicon.png|30px|Knowledge Points]]<br> or [[File:Gds3p2.png|30px|Magical Goods]] ----- [[File:Gds3p2.png|30px|Magical Goods]] ----- [[File:Gds3p2.png|30px|Magical Goods]] ----- [[File:Kpicon.png|30px|Knowledge Points]]<br>or [[File:Mana.png|30px|Mana]] ----- [[File:Mana.png|30px|Mana]] ----- [[File:Mana.png|30px|Mana]] ----- [[File:Kpicon.png|30px|Knowledge Points]]<br>or [[File:Seed_icon.png|30px|Divine Seeds]] ----- [[File:Seed_icon.png|30px|Divine Seeds]] ----- [[File:Seed_icon.png|30px|Divine Seeds]] ----- [[File:Kpicon.png|30px|Knowledge Points]]
| |
| |-
| |
| |[[File:Event_Sum_Set_2x3_0000.png|80px|Mosh Pit]]
| |
| |2x3
| |
| |[[File:Population_small_elves.png|25px|Population]] and [[File:Gds3p2.png|30px|Magical Goods]]
| |
| |[[File:Gds3p2.png|30px|Magical Goods]] ----- [[File:Gds3p2.png|30px|Magical Goods]] ----- [[File:Gds3p2.png|30px|Magical Goods]] ---- [[File:Gds3p2.png|30px|Magical Goods]]
| |
| |-
| |
| |[[File:Event_Sum_3x3_03_0000.png|80px|Dancing Ground]]
| |
| |3x3
| |
| |[[File:Gds3p2.png|30px|Magical Goods]]
| |
| |[[File:Gds3p2.png|30px|Magical Goods]] ----- [[File:Gds3p2.png|30px|Magical Goods]] ----- [[File:Gds3p2.png|30px|Magical Goods]] ---- [[File:Gds3p2.png|30px|Magical Goods]]
| |
| |}
| |
| <br>
| |
| {| style="text-align: center" class="mw-collapsible mw-collapsed"
| |
| !colspan="4"|The Harvest Festival Building Set 1 and 2
| |
| |-
| |
| |colspan="4" style="text-align:center" |[[File:SummerSet2018_1.png|650px|Harvest Temple Set]]
| |
| Set 1: Harvest Temple
| |
| |-
| |
| |colspan="1"|Building
| |
| |colspan="1"|Size
| |
| |colspan="1"|Benefits
| |
| |colspan="1"|Set Bonus
| |
| |-
| |
| |[[File:Event_Aut_Set_2x6_02_0000.png|150px|Sun Temple Complex]]
| |
| |2x6
| |
| |[[File:Population_small_elves.png|25px|Population]] and [[File:Coin_small.png|30px|Coins]]
| |
| |[[File:Coin_small.png|30px|Coins]] ---- [[File:Coin_small.png|30px|Coins]] ---- [[File:Coin_small.png|30px|Coins]] ----- [[File:Coin_small.png|30px|Coins]]
| |
| |-
| |
| |[[File:Event_Aut_Set_2x6_01_0000.png|150px|Moon Temple Complex]]
| |
| |2x6
| |
| |[[File:Population_small_elves.png|25px|Population]] and [[File:Supply_small.png|30px|Supplies]]
| |
| |[[File:Supply_small.png|30px|Supplies]] ----- [[File:Supply_small.png|30px|Supplies]] ----- [[File:Supply_small.png|30px|Supplies]] ----- [[File:Supply_small.png|30px|Supplies]]
| |
| |-
| |
| |[[File:Event_Aut_Set_3x1_01.png|100px|Temple Entrance]]
| |
| |3x1
| |
| |[[File:Gds1p1.png|30px|Basic Goods]]
| |
| |[[File:Gds1p2.png|30px|Basic Goods]] ----- [[File:Gds1.png|30px|Basic Goods]] ----- [[File:Gds1p1.png|30px|Basic Goods]] ----- [[File:Brokenshard.png|30px|Broken Shard]]
| |
| |-
| |
| |[[File:Event_Aut_Set_3x3_01_0000.png|120px|Cornucopia Sanctuary]]
| |
| |3x3
| |
| |[[File:Population_small_elves.png|25px|Population]] and [[File:Gds1p2.png|30px|Basic Goods]]
| |
| |[[File:Gds1.png|30px|Basic Goods]] ----- [[File:Gds1p1.png|30px|Basic Goods]] ----- [[File:Gds1p2.png|30px|Basic Goods]] ----- [[File:Kpicon.png|30px|Knowledge Point]]
| |
| |-
| |
| |[[File:Event_Aut_Set_3x2_01_0000.png|120px|Harvest Storage]]
| |
| |3x2
| |
| ||[[File:Gds1.png|30px|Basic Goods]]
| |
| |[[File:Gds1p1.png|30px|Basic Goods]] ----- [[File:Gds2p2.png|30px|Basic Goods]] ----- [[File:Gds1.png|30px|Basic Goods]] ----- [[File:Brokenshard.png|30px|Broken Shard]]
| |
| |-
| |
| !colspan="4" |
| |
| |-
| |
| |colspan="4" style="text-aligh: center" |[[File:SummerSet2018_2.png|600px|Shrines of Sun and Moon Set]]
| |
| Set 2: Shrines of Sun and Moon
| |
| |-
| |
| |colspan="1"|Building
| |
| |colspan="1"|Size
| |
| |colspan="1"|Benefits
| |
| |colspan="1"|Set Bonus
| |
| |-
| |
| |[[File:Event_Aut_5x3_01_0000.png|120px|Kirit, Weasel God of Night Fruit]]
| |
| |5x3
| |
| |[[File:Population_small_elves.png|25px|Population]] and [[File:Gds2p2.png|30px|Crafted Goods]]
| |
| |[[File:Gds2p2.png|30px|Crafted Goods]] -----[[File:Gds2p2.png|30px|Crafted Goods]] ----- [[File:Kpicon.png|30px|Knowledge Point]]
| |
| |-
| |
| |[[File:Event_Aut_4x4_01_0000.png|120px|Krarak, Bird God of Sun Harvest]]
| |
| |4x4
| |
| |[[File:Population_small_elves.png|25px|Population]] and [[File:Gds3p2.png|30px|Magical Goods]]
| |
| |[[File:Gds3p2.png|30px|Magical Goods]] -----[[File:Gds3p2.png|30px|Magical Goods]] ----- [[File:Kpicon.png|30px|Knowledge Point]]
| |
| |-
| |
| |[[File:Event_Aut_1x1_01.png|80px|Shrine of Kirit]]
| |
| |1x1
| |
| |[[File:Supply_small.png|30px|Supplies]]<br>or [[File:Gds3p1.png|30px|Magical Goods]]<br> or [[File:Mana.png|30px|Mana]]
| |
| |[[File:Supply_small.png|30px|Supplies]] ----- [[File:Supply_small.png|30px|Supplies]] ----- [[File:Supply_small.png|30px|Supplies]]<br>or [[File:Gds3p1.png|30px|Magical Goods]] ----- [[File:Gds3p1.png|30px|Magical Goods]] ----- [[File:Gds3p1.png|30px|Magical Goods]]<br>or [[File:Mana.png|30px|Mana]] ----- [[File:Mana.png|30px|Mana]] ----- [[File:Mana.png|30px|Mana]]
| |
| |-
| |
| |[[File:Event_Aut_1x1_02.png|80px|Shrine of Krarak]]
| |
| |1x1
| |
| |[[File:Supply_small.png|30px|Supplies]]<br>or [[File:Gds3p1.png|30px|Magical Goods]]<br> or [[File:Seed_icon.png|30px|Divine Seeds]]
| |
| |[[File:Supply_small.png|30px|Supplies]] ----- [[File:Supply_small.png|30px|Supplies]] ----- [[File:Supply_small.png|30px|Supplies]]<br>or [[File:Gds3p1.png|30px|Magical Goods]] ----- [[File:Gds3p1.png|30px|Magical Goods]] ----- [[File:Gds3p1.png|30px|Magical Goods]]<br>or [[File:Seed_icon.png|30px|Divine Seeds]] ----- [[File:Seed_icon.png|30px|Divine Seeds]] ----- [[File:Seed_icon.png|30px|Divine Seeds]]
| |
| |-
| |
| |}
| |
| | |
| <br>
| |
| {| style="text-align: center" class="mw-collapsible mw-collapsed"
| |
| !colspan="4"|The Winter Magic Set 1 and 2
| |
| |-
| |
| |colspan="4" style="text-align:center" |[[File:WinterSet2018_1.png|650px|Winter Market Set]]
| |
| Set 1: Winter Market Set
| |
| |-
| |
| |colspan="1"|Building
| |
| |colspan="1"|Size
| |
| |colspan="1"|Benefits
| |
| |colspan="1"|Set Bonus
| |
| |-
| |
| |[[File:Event_Win_Set_2x3_01_0000.png|150px|Market Stalls]]
| |
| |2x3
| |
| |[[File:Culture.png|30px|Culture]] and [[File:Gds1p1.png|30px|Basic Goods]]
| |
| |[[File:Gds1p1.png|30px|Basic Goods]] ---- [[File:Gds1p1.png|30px|Basic Goods]]
| |
| |-
| |
| |[[File:Event_Win_Set1_2x4_01.png|150px|Winter Fair]]
| |
| |2x4
| |
| |[[File:Culture.png|30px|Culture]] and [[File:Gds2p1.png|30px|Crafted Goods]]
| |
| |[[File:Gds2p1.png|30px|Crafted Goods]] ----- [[File:Gds2p1.png|30px|Crafted Goods]]
| |
| |-
| |
| |[[File:Event_Win_3x2_Set1_01_0000.png|120px|Elvenade Booth]]
| |
| |3x2
| |
| |[[File:Culture.png|30px|Culture]] and [[File:Supply_small.png|30px|Supplies]]
| |
| |[[File:Supply_small.png|30px|Supplies]] ----- [[File:Coin_small.png|30px|Coins]] ----- [[File:Supply_small.png|30px|Supplies]]
| |
| |-
| |
| |[[File:Event_Win_Set1_3x3_01_0000.png|100px|Sled Carousel]]
| |
| |3x3
| |
| |[[File:Culture.png|30px|Culture]] and [[File:Gds3p1.png|30px|Magical Goods]]
| |
| |[[File:Gds3p1.png|30px|Magical Goods]] ----- [[File:Gds3p1.png|30px|Magical Goods]] ----- [[File:Brokenshard.png|30px|Broken Shard]]
| |
| |-
| |
| |[[File:Event_Win_Set1_3x6_01_0000.png|120px|Frost Carved Christmas Tree]]
| |
| |3x6
| |
| |[[File:Culture.png|30px|Culture]] and [[File:Supply_small.png|30px|Supplies]]
| |
| |[[File:Supply_small.png|30px|Supplies]] ----- [[File:Supply_small.png|30px|Supplies]] ----- [[File:Kpicon.png|30px|Knowledge Point]] ----- [[File:Kpicon.png|30px|Knowledge Point]]<br>or [[File:Gds3p1.png|30px|Magical Goods]] ----- [[File:Gds3p1.png|30px|Magical Goods]] ----- [[File:Kpicon.png|30px|Knowledge Point]] ----- [[File:Kpicon.png|30px|Knowledge Point]]<br>or [[File:Mana.png|30px|Mana]] ----- [[File:Mana.png|30px|Mana]] ----- [[File:Kpicon.png|30px|Knowledge Point]] ----- [[File:Kpicon.png|30px|Knowledge Point]]
| |
| |-
| |
| !colspan="4" |
| |
| |-
| |
| |colspan="4" style="text-aligh: center" |[[File:WinterSet2018_2.png|600px|Snow Owls Set]]
| |
| Set 2: Snow Owls Set
| |
| |-
| |
| |colspan="1"|Building
| |
| |colspan="1"|Size
| |
| |colspan="1"|Benefits
| |
| |colspan="1"|Set Bonus
| |
| |-
| |
| |[[File:Event_Win_Set2_2x4_0000.png|120px|Clocktower Owls]]
| |
| |2x4
| |
| |[[File:Populationadd.png|25px|Population]] and [[File:Culture.png|30px|Culture]] and [[File:Coin_small.png|30px|Coins]]
| |
| |[[File:Coin_small.png|30px|Coins]] ----- [[File:Kpicon.png|30px|Knowledge Point]]
| |
| |-
| |
| |[[File:Event_Win_Set2_5x2_0000.png|120px|Stable of the Snow Owl]]
| |
| |5x2
| |
| |[[File:Populationadd.png|25px|Population]] and [[File:Culture.png|30px|Culture]] and [[File:Supply_small.png|30px|Supplies]]<br>or [[File:Gds3p1.png|30px|Magical Goods]]<br>or [[File:Mana.png|30px|Mana]]
| |
| |[[File:Supply_small.png|30px|Supplies]] ----- [[File:Kpicon.png|30px|Knowledge Point]]<br>or [[File:Gds3p1.png|30px|Magical Goods]] ----- [[File:Kpicon.png|30px|Knowledge Point]]<br>or [[File:Mana.png|30px|Mana]] ----- [[File:Kpicon.png|30px|Knowledge Point]]
| |
| |-
| |
| |[[File:Event_Win_Set2_3x4_01_0000.png|120px|Yeti Santas Christmas Factory]]
| |
| |3x4
| |
| |[[File:Populationadd.png|25px|Population]] and [[File:Culture.png|30px|Culture]] and [[File:Supply_small.png|30px|Supplies]]<br>or [[File:Gds3p1.png|30px|Magical Goods]]<br>or [[File:Mana.png|30px|Mana]]<br>or [[File:Seed_icon.png|30px|Divine Seeds]]
| |
| |[[File:Supply_small.png|30px|Supplies]] ----- [[File:Kpicon.png|30px|Knowledge Point]]<br>or [[File:Gds3p1.png|30px|Magical Goods]] ----- [[File:Kpicon.png|30px|Knowledge Point]]<br>or [[File:Mana.png|30px|Mana]] ----- [[File:Kpicon.png|30px|Knowledge Point]]<br>or [[File:Seed_icon.png|30px|Divine Seeds]] ----- [[File:Kpicon.png|30px|Knowledge Point]]
| |
| |-
| |
| |}
| |
| <br>
| |
| {| style="text-align: center" class="mw-collapsible mw-collapsed"
| |
| !colspan="11"|Carnival Building Set
| |
| |-
| |
| |colspan="4" style="text-align:center" |[[File:Evt_Car_XIX_Set.png|500px|Carnival Set]]
| |
| Carnival Set
| |
| |-
| |
| |Building
| |
| |colspan="1"|Size
| |
| |colspan="1"|Benefits
| |
| |colspan="1"|Set Bonus
| |
| |-
| |
| |[[File:Evt_Car_XIX_Tavern.png|80px|Jester’s Tavern]]
| |
| |4x4
| |
| |[[File:Culture.png|25px|Culture]] and [[File:Good_elixir_small.png|Elixir]]
| |
| | |
| |[[File:Good_magic_dust_small.png|Magic Dust]] ---- [[File:Good_gems_small.png|Gems]] ----- [[File:Kpicon.png|30px|Knowledge Points]]
| |
| |-
| |
| |[[File:Evt_Car_XIX_Band.png|80px|Marching Band]]
| |
| |4x2
| |
| |[[File:Culture.png|25px|Culture]] and [[File:Supply_small.png|25px|Supplies]]<br>or [[File:Gds3p1.png|30px|Magical Goods]]<br>or [[File:Mana.png|30px|Mana]]<br>or [[File:Seed_icon.png|30px|Divine Seeds]]
| |
| |[[File:Supply_small.png|25px|Supplies]] ----- [[File:Supply_small.png|25px|Supplies]]<br> or [[File:Gds3p1.png|30px|Magical Goods]] ----- [[File:Gds3p1.png|30px|Magical Goods]]<br> or [[File:Mana.png|30px|Mana]] ----- [[File:Mana.png|30px|Mana]]<br> or [[File:Seed_icon.png|30px|Divine Seeds]] ----- [[File:Seed_icon.png|30px|Divine Seeds]]
| |
| | |
| |-
| |
| |[[File:Evt_Car_XIX_Fountain.png|80px|Revelers Fountain]]
| |
| |3x3
| |
| |[[File:Culture.png|25px|Culture]] and [[File:Supply_small.png|25px|Supplies]]<br>or [[File:Gds3p1.png|30px|Magical Goods]]<br>or [[File:Mana.png|30px|Mana]]
| |
| |[[File:Supply_small.png|25px|Supplies]] ----- [[File:Supply_small.png|25px|Supplies]] ----- [[File:Supply_small.png|25px|Supplies]] ----- [[File:Supply_small.png|25px|Supplies]]<br> or [[File:Gds3p1.png|30px|Magical Goods]] ----- [[File:Gds3p1.png|30px|Magical Goods]] ----- [[File:Gds3p1.png|30px|Magical Goods]] ----- [[File:Gds3p1.png|30px|Magical Goods]]<br>or [[File:Mana.png|30px|Mana]] ----- [[File:Mana.png|30px|Mana]] ----- [[File:Mana.png|30px|Mana]] ----- [[File:Mana.png|30px|Mana]]
| |
| |-
| |
| |[[File:Evt_Car_XIX_Banquet.png|80px|Banquet]]
| |
| |5x3
| |
| |[[File:Culture.png|25px|Culture]] and [[File:Supply_small.png|25px|Supplies]]
| |
| |[[File:Supply_small.png|25px|Supplies]] ----- [[File:Brokenshard.png|30px|Broken Shard]] ----- [[File:Kpicon.png|30px|Knowledge Points]]
| |
| |-
| |
| |[[File:Evt_Car_XIX_Fireworks.png|80px|Festive Fireworks]]
| |
| |2x3
| |
| |[[File:Culture.png|25px|Culture]] and [[File:Coin_small.png|30px|Coins]]
| |
| |[[File:Coin_small.png|30px|Coins]] ----- [[File:Coin_small.png|30px|Coins]]
| |
| |}
| |
| <br>
| |
| ====Crafting Set====
| |
| <!-- This didn't seem to work? -->
| |
| {| style="text-align: center" class="mw-collapsible mw-collapsed"
| |
| !colspan="11"|Magical Chess Set
| |
| |-
| |
| |colspan="4" style="text-align:center" |[[File:Crafting_Set1.png|500px|Chess Set]]
| |
| Magical Chess Set
| |
| |-
| |
| |Building
| |
| |colspan="1"|Size
| |
| |colspan="1"|Benefits
| |
| |colspan="1"|Set Bonus
| |
| |-
| |
| |[[File:A_Evt_Set_A_ChessA.png|80px|Golden King]]
| |
| |2x3
| |
| |[[File:Culture.png|25px|Culture]] and [[File:Supply_small.png|25px|Supplies]]<br>or [[File:Gds3.png|30px|Magical Goods]]<br>or [[File:Mana.png|30px|Mana]]
| |
| | |
| |
| |
| | |
| [[File:Supply_small.png|25px|Supplies]] ---- [[File:Supply_small.png|25px|Supplies]] ----- [[File:Kpicon.png|30px|Knowledge Points]]<br>or
| |
| [[File:Gds3.png|30px|Magical Goods]] ---- [[File:Gds3.png|30px|Magical Goods]] ----- [[File:Kpicon.png|30px|Knowledge Points]]<br>or
| |
| [[File:Mana.png|30px|Mana]] ---- [[File:Mana.png|30px|Mana]] ----- [[File:Kpicon.png|30px|Knowledge Points]]
| |
| |-
| |
| |[[File:A_Evt_Set_A_ChessB.png|80px|Solar Rook]]
| |
| |1x4
| |
| |[[File:Culture.png|25px|Culture]] and [[File:Coin_small.png|30px|Coins]]
| |
| |[[File:Coin_small.png|30px|Coins]] ----- [[File:Supply_small.png|25px|Supplies]]
| |
| |-
| |
| |[[File:A_Evt_Set_A_ChessC.png|80px|Flame Knight]]
| |
| |1x3
| |
| |[[File:Culture.png|25px|Culture]] and [[File:Supply_small.png|25px|Supplies]]<br>or [[File:Gds3p1.png|30px|Magical Goods]]<br>or [[File:Mana.png|30px|Mana]]<br>or [[File:Seed_icon.png|30px|Divine Seeds]]
| |
| |[[File:Supply_small.png|25px|Supplies]] ----- [[File:Supply_small.png|25px|Supplies]]<br> or [[File:Gds3p1.png|30px|Magical Goods]] ----- [[File:Gds3p1.png|30px|Magical Goods]]<br> or [[File:Mana.png|30px|Mana]] ----- [[File:Mana.png|30px|Mana]]<br> or [[File:Seed_icon.png|30px|Divine Seeds]] ----- [[File:Seed_icon.png|30px|Divine Seeds]]
| |
| | |
| |-
| |
| |[[File:A_Evt_Set_A_ChessD.png|80px|Tome Bishop]]
| |
| |3x1
| |
| |[[File:Culture.png|25px|Culture]] and [[File:Supply_small.png|25px|Supplies]]
| |
| |[[File:Supply_small.png|25px|Supplies]] ----- [[File:Coin_small.png|30px|Coins]] ----- [[File:Coin_small.png|30px|Coins]]
| |
| |}
| |
|
| |
|
| ===Setbonus=== | | ===Setbonus=== |